Loctite Henkel Premium Partner
 Free delivery from 600 EURO to EU Countries*
  +48 509 336 666


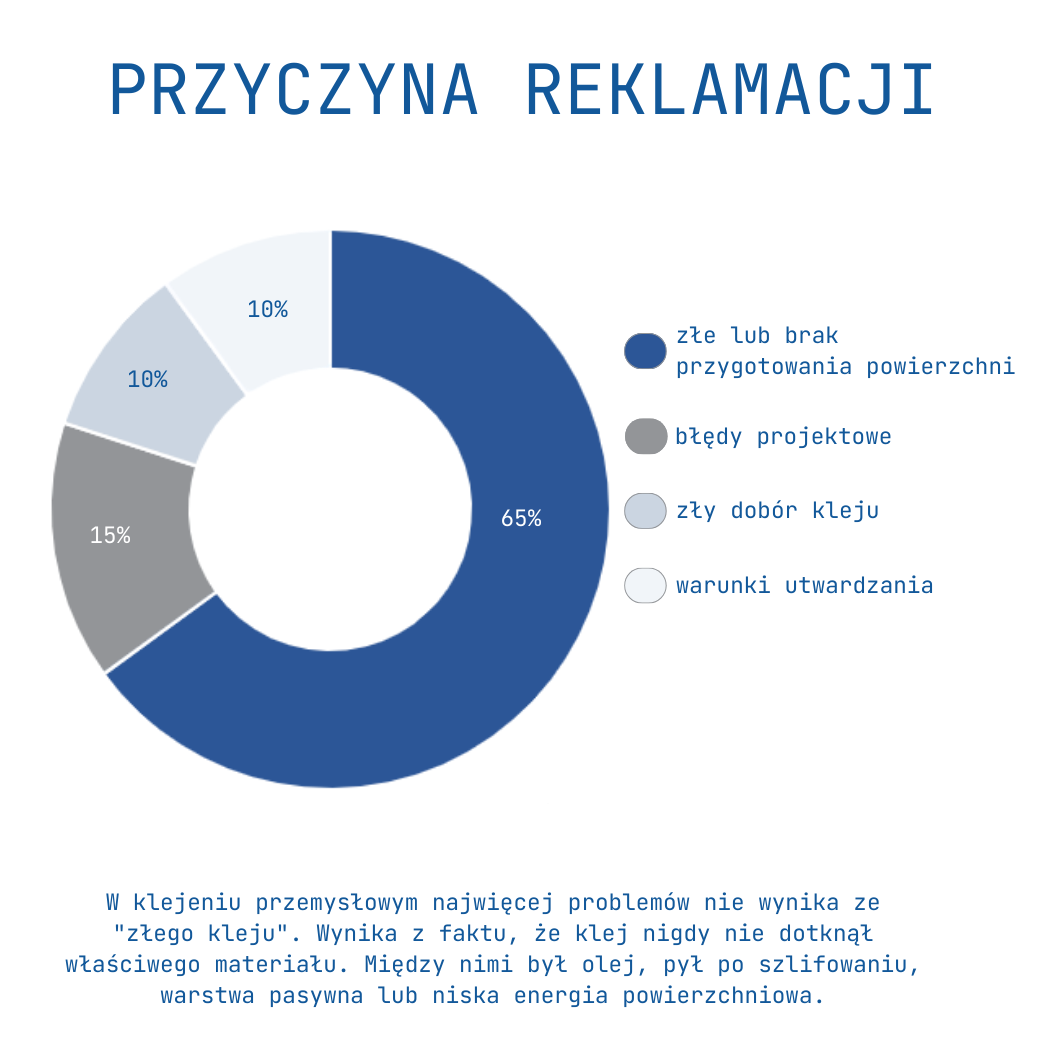
If in your company the adhesive “holds one time and fails the next”, and complaints keep coming back even after switching products — in most cases the root cause is surface condition and process repeatability, not the tube itself.
The single most important rule (print it and post it on the production floor): always degrease and do not touch the bonding area after cleaning (even with gloves). This is the simplest “quality win” you can implement immediately.
1) Quick cheat sheet: what we always do before we even think about primer
For an adhesive to bond to a substrate, two things must happen: wetting (the adhesive must spread over the surface) and adhesion (a strong interface bond). Oil, silicone residue, sanding dust, or condensation from a cold part can kill both within seconds.
Minimum process standard: (1) degreasing → (2) mechanical abrasion only when it makes sense → (3) dust removal → (4) “final” degreasing → (5) bonding within the time window. If you add plasma/corona or primer, these basics must be done perfectly — otherwise you’re adding cost without stabilizing results.
2) Degreasing that actually works (and doesn’t smear dirt)
In industrial practice, the most common mistake is “one wipe and done”. That’s like washing the floor with dirty water — contamination gets redistributed back onto the part.
The two-wipe technique (recommended for Maintenance and short runs)
Step 1: the first wipe removes the main contamination (oils, coolants, dust). Step 2: the second wipe with fresh, clean lint-free cloth “finishes” the degrease. Rule of thumb: one wipe stroke = one clean side of the wipe. After cleaning, do not touch the bonding area.
Recommended base cleaners:
[product id="3526,2242,3652"]
Simple quality checks (no lab required)
Water-break test: if water forms a continuous film, you’re usually in good shape. If it beads up and breaks, you still have oil/silicone.
DYNE markers: a fast way to check surface energy on plastics (especially useful for PE/PP).
What are DYNE markers (dyne pens) and how to use them
DYNE markers (often called dyne pens or surface tension test inks) are a simple tool for quickly checking the surface energy of a material — in other words, whether an adhesive has a realistic chance to wet the substrate properly. This matters most for low-surface-energy plastics (LSE) such as PE, PP and often also POM.
How does a DYNE test work? You draw a short line using a marker rated at a specific value (e.g., 38, 40, 42 dyn/cm). If the line remains continuous for a brief moment (instead of pulling back into droplets), the surface energy is at least that value. If the line breaks or beads quickly, the surface energy is lower.
Step-by-step (the simplest procedure):
✅ 1) Degrease and dry the sample (and do not touch the test area after cleaning).
✅ 2) Start with a lower value (e.g., 38 dyn/cm).
✅ 3) Draw a short line and observe for about 2 seconds.
✅ 4) If the line stays continuous, go higher (e.g., 40, then 42). If it breaks, go lower.
✅ 5) Record the result and standardize the process: same cleaner, same timing, same procedure.
Important limitation: a DYNE marker does not guarantee long-term bond durability. It is a process control check (is the surface active and repeatable). Final validation still requires testing on the real part and real operating conditions (humidity, temperature, chemicals, UV).
Safety: DYNE inks can be solvent-based — use gloves, ventilation, and avoid testing surfaces that must not come into contact with such chemistry.
3) Abrasion and dust removal: when it makes a real difference
Mechanical preparation makes sense when you need structural adhesion (load, impact, fatigue) or when the substrate has a weak surface layer (oxides, deposits, problematic coatings). Key rule: after sanding or blasting, always remove dust and do a final degrease — otherwise you’re bonding to dust, not to the substrate.
4) Surface activation: corona and plasma (and why time matters)
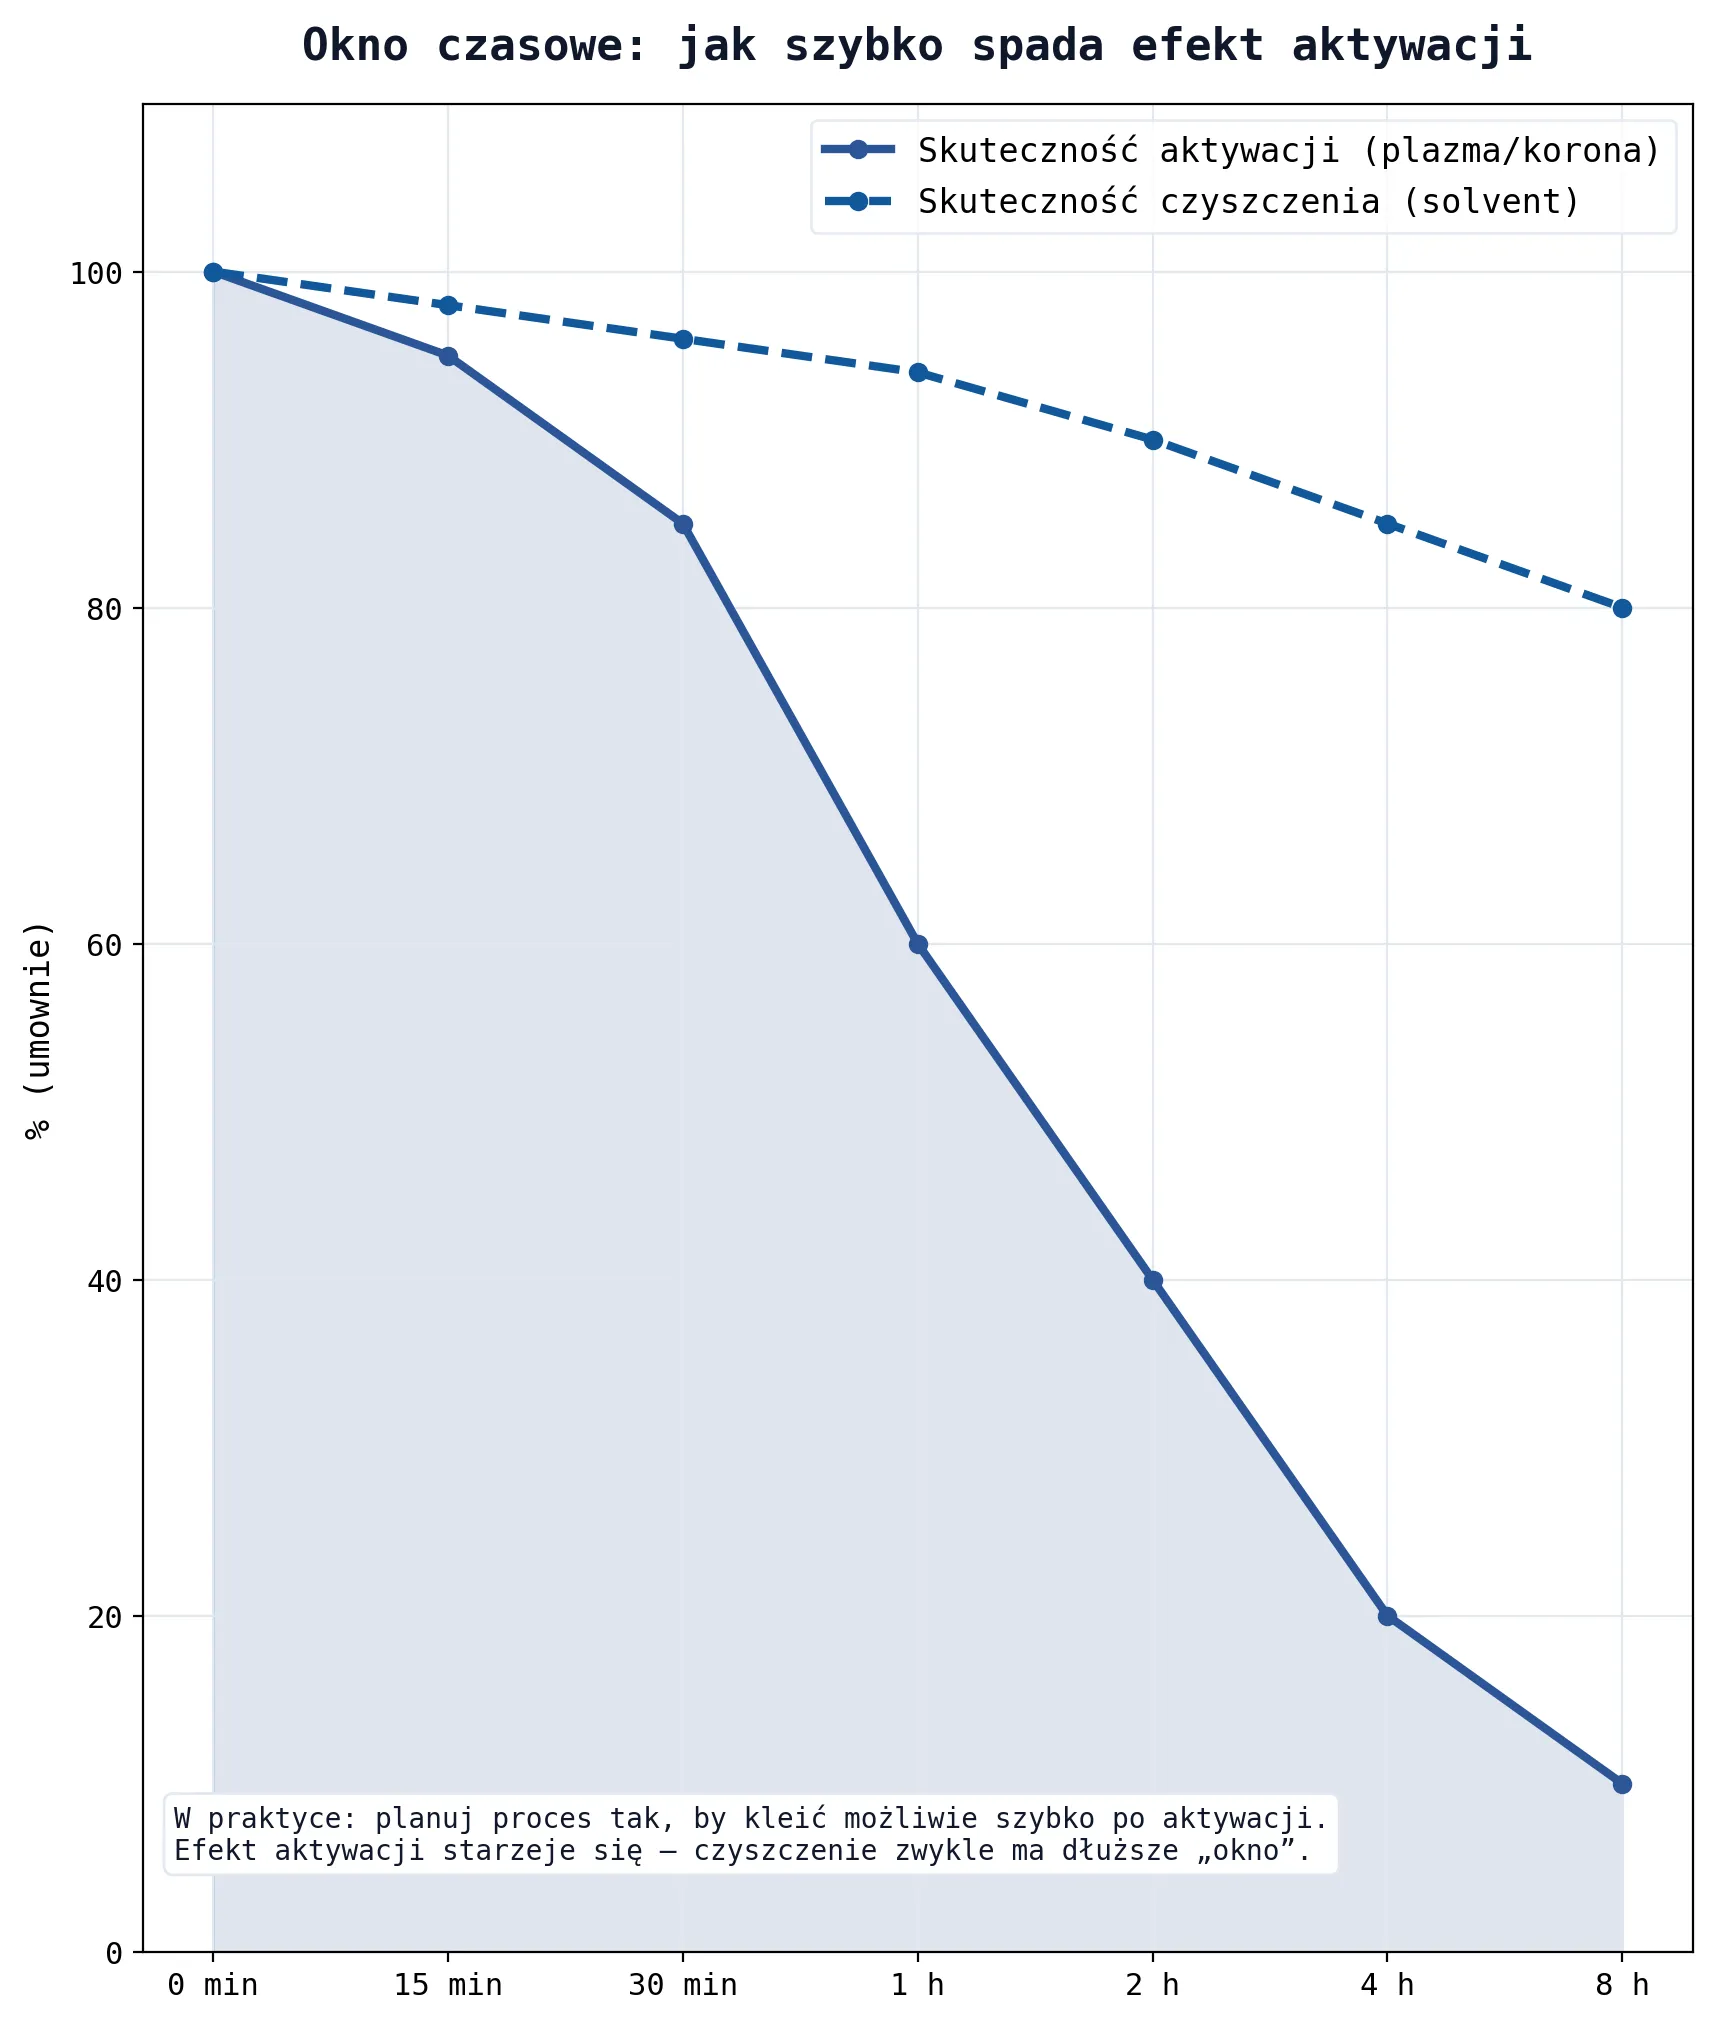
For PE/PP/POM the core issue is often not “dirt” but low surface energy — the adhesive won’t wet the surface and cannot build stable adhesion. Activation (corona/plasma) raises surface energy and improves repeatability, but there’s a catch: the effect ages. Plan the process so bonding happens as soon as possible after activation.
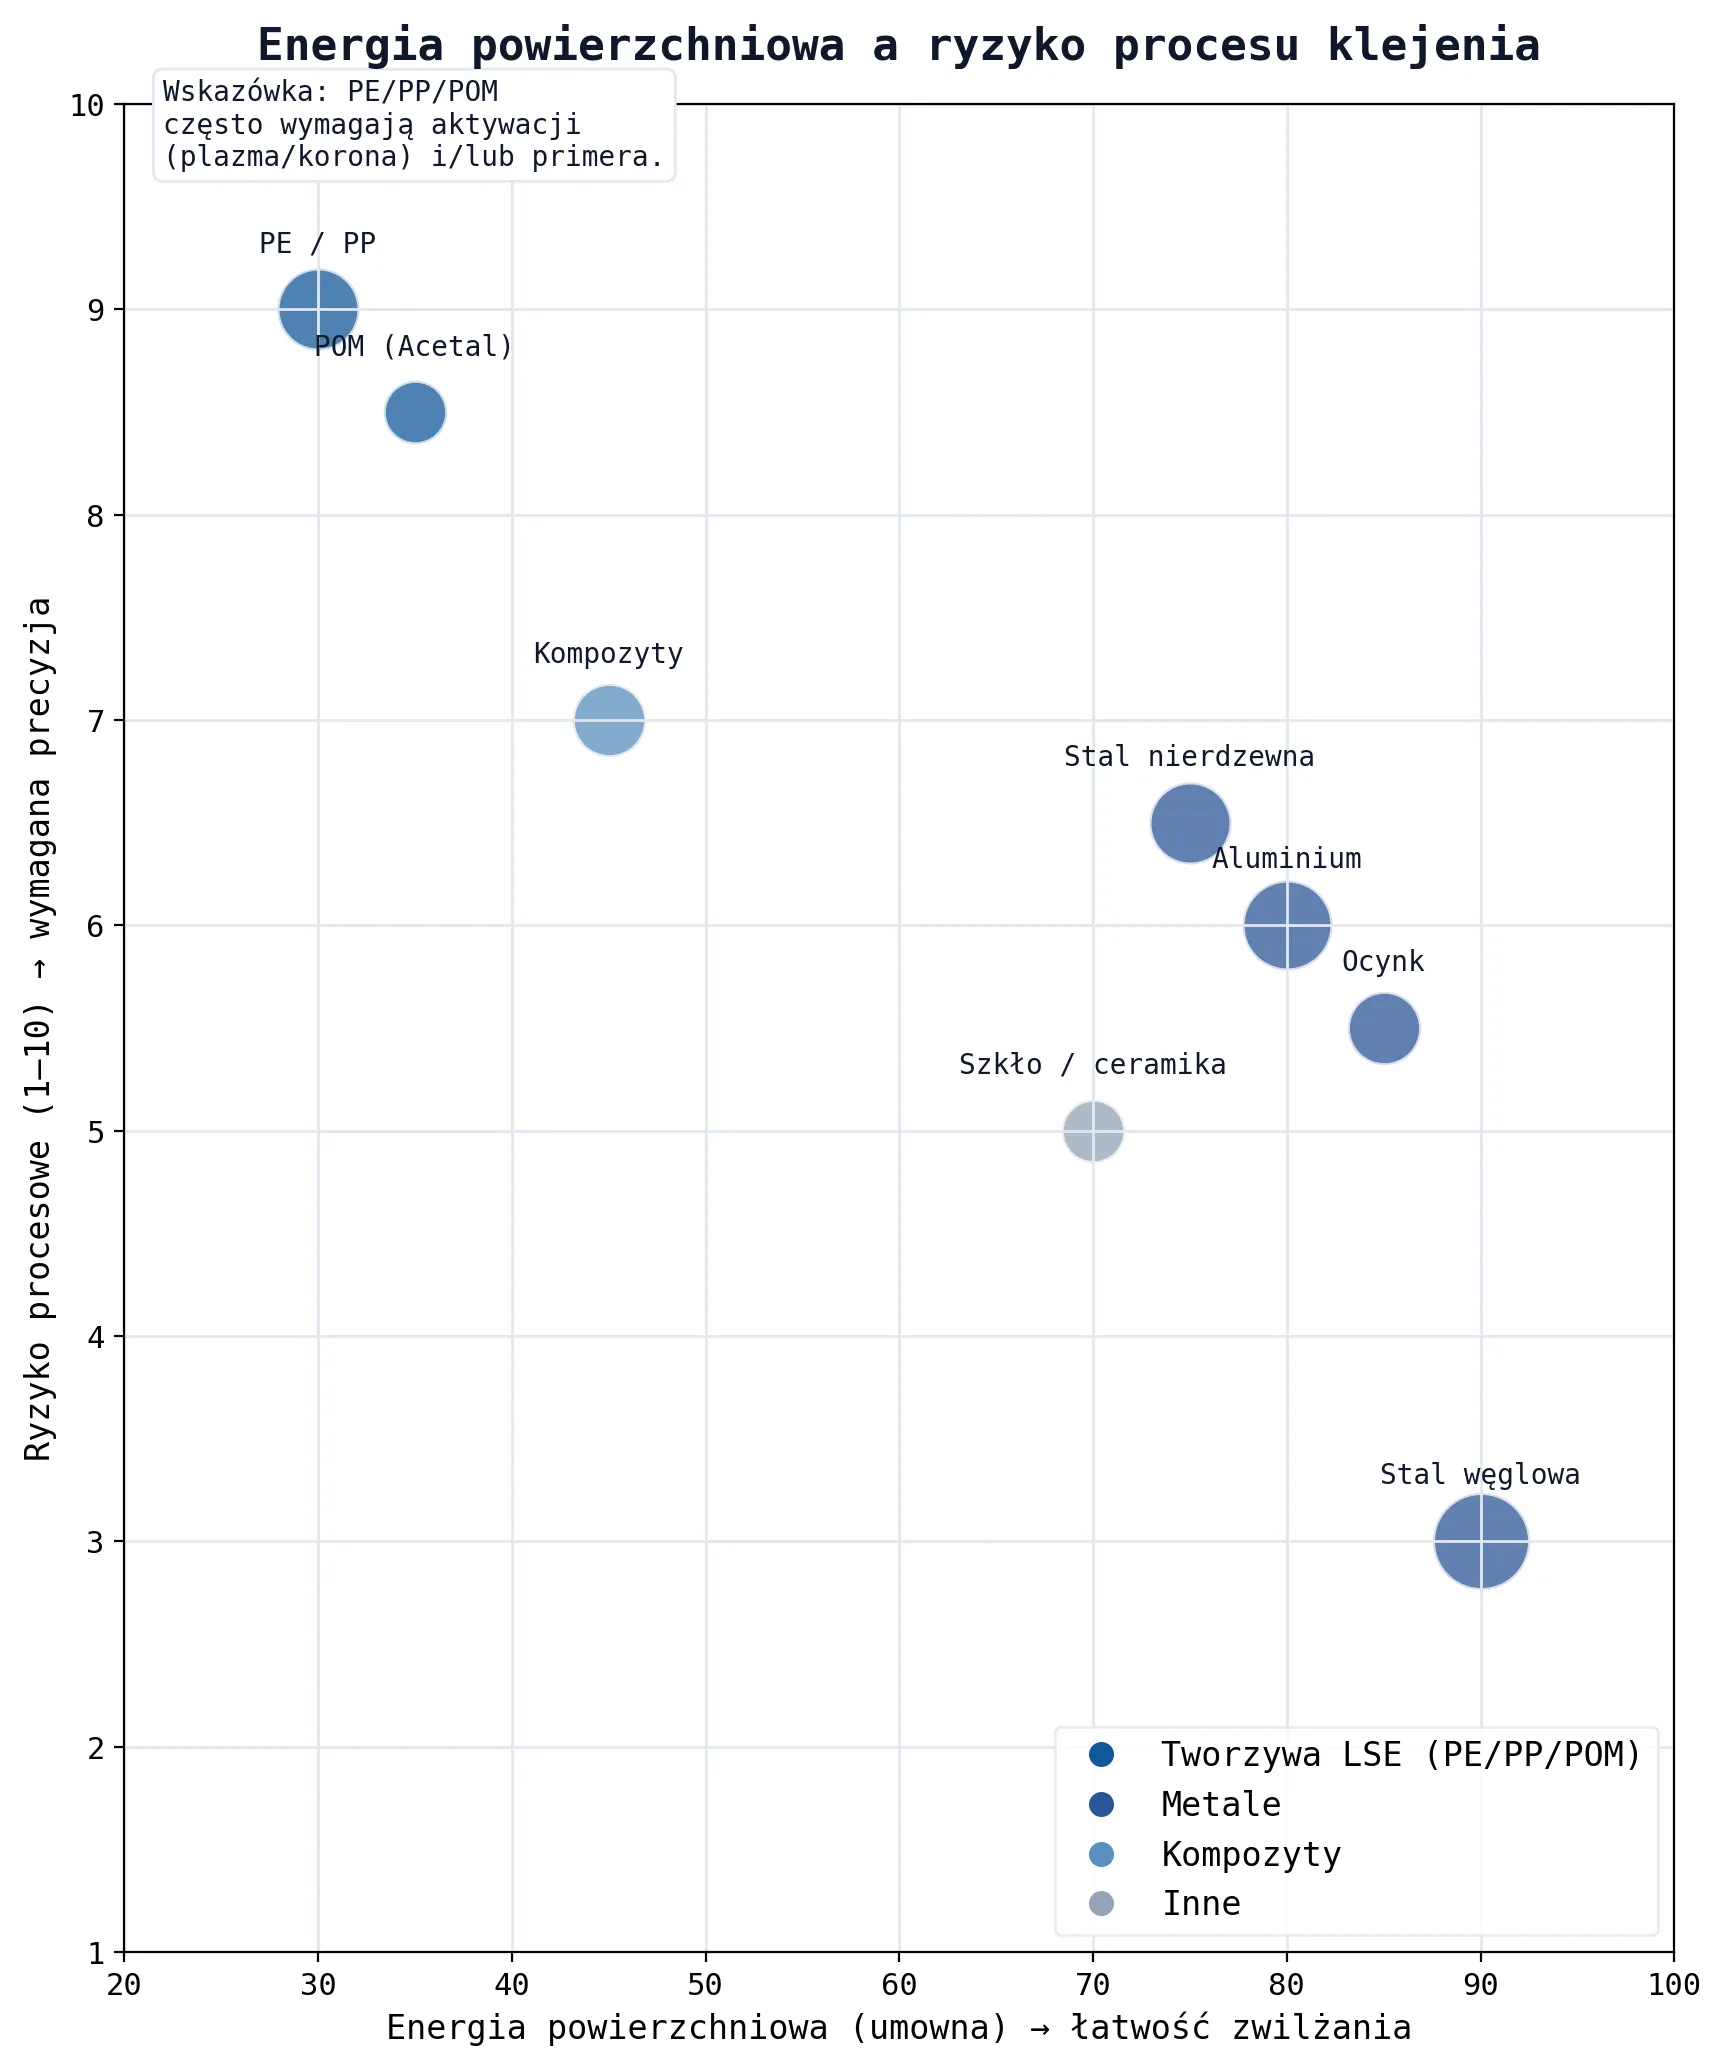
PE/PP/POM = high process risk without activation and/or primer.
5) Primer vs activator: when it’s a must-have, and when it’s just cost
On the shop floor, “primer” and “activator” are often used interchangeably, but technically they serve different roles:
Primer builds an intermediate layer and improves long-term adhesion. An activator typically improves initiation/curing kinetics (e.g., on passive metals with anaerobics) and stabilizes results when, without it, “sometimes it works, sometimes it doesn’t”.
Cases where primer/activator most often saves the result
PE/PP + cyanoacrylate (CA): very often you need LOCTITE SF 770 (polyolefin primer) and/or activation (plasma/corona).
Stainless steel / aluminium / zinc-plated steel + anaerobic (threads/retaining): for repeatability, it’s common to add LOCTITE SF 7649 (anaerobic activator).
Glass + PU bonding: instead of PU 8519 P / 8517 H you can use TEROSON BOND ALL IN ONE PRIMER (follow the TDS and validate in real application conditions).
Paints/coatings + PU/MS: if the coating is difficult or results are unstable, a promoter like TEROSON SB 450 can be critical — but first confirm coating integrity (sometimes it must be removed).
[product id="2026,2027,2244,3640"]
6) Practical matrix: material → minimum preparation process
| Material | Minimum process (sequence) | When activation/primer/activator is needed | Most common pitfall |
|---|---|---|---|
| Carbon steel | Degrease → (opt.) abrade → dust off → degrease (final) → bond | Rarely; cleanliness and repeatability are usually enough | Touching after cleaning / sanding dust |
| Zinc-plated steel (Zn) | Degrease → light abrasion → dust off → degrease → bond | Anaerobics: activator often improves repeatability; testing recommended | Batch-to-batch variability of the surface |
| Stainless steel | Degrease → abrade → dust off → degrease → bond | Anaerobics: activator often recommended; CA: sometimes helps in cold conditions | Passive surface + too smooth finish |
| Aluminium | Degrease → abrade → dust off → degrease → bond soon after preparation | Anaerobics: activator often recommended; critical joints require validation tests | Oxides + too much time between prep and bonding |
| Brass | Degrease → (opt.) light abrasion → degrease → bond | Usually no; degreasing is the key | Machining oil residue |
| Glass / ceramic | Degrease → do not touch → bond | PU bonding: primer is very common; humidity increases process sensitivity | Fingerprints / insufficient drying after washing |
| Paint / powder coating | Degrease → check coating integrity → (opt.) abrade → degrease → bond | PU/MS: promoter for difficult coatings; sometimes the coating must be removed | Bonding “to paint” that flakes off |
| PE / PP | Degrease → corona/plasma → bond quickly | CA: polyolefin primer is often required; without activation results are unpredictable | No control of surface energy + too much time after activation |
| POM | Degrease → (recommended) plasma → bond (validate) | Often requires activation; sometimes needs a design-driven approach | Unstable adhesion across production runs |
| GFRP/CFRP composites | Degrease → abrade → dust off → degrease → bond | Plasma improves repeatability (especially after storage) | Dust/resin smear after machining |
| Wood | Dust off → (opt.) sanding → dust off → bond | Primer rarely; moisture content and absorbency matter more | Moisture / dust / adhesive soaking into pores |
7) The most common mistakes that cause complaints (and how to eliminate them from the process)
In most complaints, the issue is not the adhesive but process repeatability: touching the bonding area after degreasing, skipping dust removal, condensation on cold parts, or applying primer as a thick “paint layer”. Below are the mistakes that truly drive rework and returns — and how to remove them from daily production.

1) Touching after cleaning — set a rule: handle parts only outside the bond zone and only with clean gloves.
2) No dust removal after abrasion — dust is a release layer. Remove dust and do a final degrease.
3) Primer applied too thick — primer must be a thin film, not a coating.
4) Bonding on a cold part — condensation = zero adhesion. Stabilize temperature and avoid dew point issues.
5) Exceeding the time window after activation — plasma/corona ages; bond soon after the process.
8) Maintenance / Production checklist (implement in 1 day)
✅ One clear degreasing standard (cleaner + two-wipe technique).
✅ No-touch rule for the bonding area after cleaning (and enforce it at the station).
✅ Dust removal after mechanical prep as a mandatory step.
✅ For PE/PP/POM: decide “activation (corona/plasma) vs primer” + define the time window rule.
✅ A simple process check (water-break / DYNE) used as QC, not “a lab experiment”.
FAQ — questions we actually hear in Maintenance and in search
How do I degrease steel before bonding so the joint doesn’t fail after a week?
Use a proper cleaner, lint-free wipes, and the two-wipe technique. Most failures come from smeared oil and touching after cleaning — not from the adhesive itself.
Why doesn’t the adhesive hold on zinc plating (Zn) even though it works on steel?
Zinc-plated surfaces can vary between batches and can behave as “passive” for certain chemistries. Light abrasion, strict cleanliness, and (for anaerobics) an activator often improve repeatability.
What can I do to make CA bond reliably to PE/PP?
Without activation (corona/plasma) and/or a polyolefin primer, results are often random. If the joint is critical, validate on the real part in real conditions.
How much time do I have after plasma/corona before bonding?
It depends on the material and process, but the rule is simple: bond as soon as possible after activation and keep parameters consistent (distance, power, speed).
Do I have to abrade aluminium before bonding with epoxy?
For loaded joints, usually yes — abrasion + dust removal + degreasing improves repeatability. For simple applications, perfect degreasing can sometimes be enough, but verify on samples.
Primer or activator — which one should I choose?
A primer mainly improves long-term adhesion (a chemical “bridge”), while an activator often stabilizes or initiates the cure on passive metals (e.g., stainless/aluminium with anaerobics). Always confirm the choice with a validation test.
Summary and quick help with selection
If you want to reduce complaints, start with two things: repeatable degreasing and no touching the bonding area after cleaning. Only then add activation or primer where it truly increases repeatability (PE/PP, passive metals, glass in PU systems).
Want help selecting the right process? Tell us the substrates, operating environment (humidity/temperature/chemicals), and the adhesive type you’re considering — we’ll recommend the shortest path to stable results and the right products.
Expert signature
Maciej Klus
Bonding & Surface Preparation Specialist — Melkib (Cieszyn)
We support companies in selecting the right chemistry and procedure for real substrates and real operating conditions (humidity, temperature, vibration, chemicals). If you want to reduce complaint risk, prepare: substrate details, load/environment description, and photos of the part — we’ll recommend an optimal process and suitable products.