




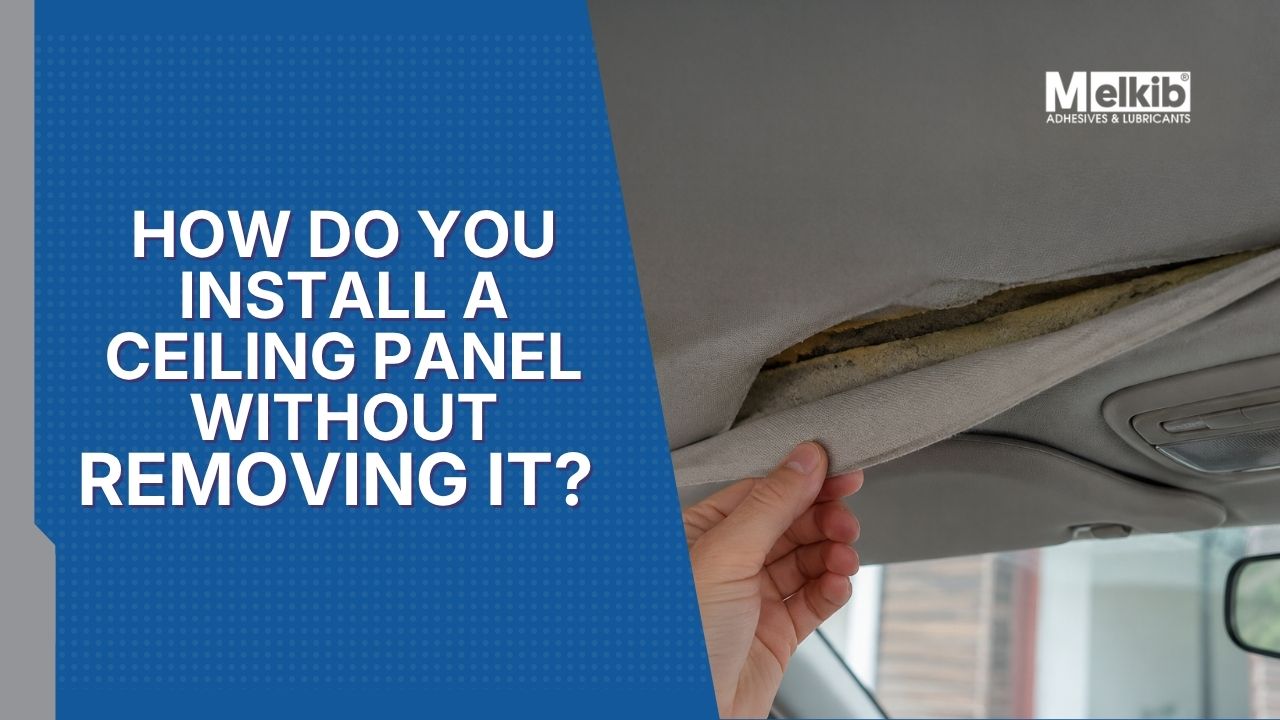
How can you reattach a car headliner without removing it? You can do it yourself if only a small section of the fabric has come loose and the old foam and substrate do not crumble under your fingers. If the headliner is sagging over a larger area, removing the backing panel and reupholstering the entire headliner is usually the better solution.
This guide covers two scenarios: repairing the headliner without removing it and replacing the entire material. We also explain what to use to glue a car headliner, when a headliner adhesive used without removal makes sense, and when even a good adhesive cannot save an old, degraded foam layer.
Key takeaways
- Repairing the headliner without removal works well for small, localised areas of detachment, for example near an edge, interior light, grab handle, pillar or sun visor.
- Full headliner replacement is more sensible when the material is sagging over a large area or the old foam has turned into powder.
- Headliners are usually bonded with contact adhesives intended for fabrics and foams, most commonly in spray form or as brush-applied products.
- Temperature resistance is important because a car roof can become very hot, especially in summer.
- The durability of the repair depends primarily on surface preparation: removing loose foam, dust, dirt and greasy deposits.
- The most common mistake is applying adhesive over old, crumbling foam. The adhesive then bonds to a layer that will detach anyway.
Why does a car headliner come loose?
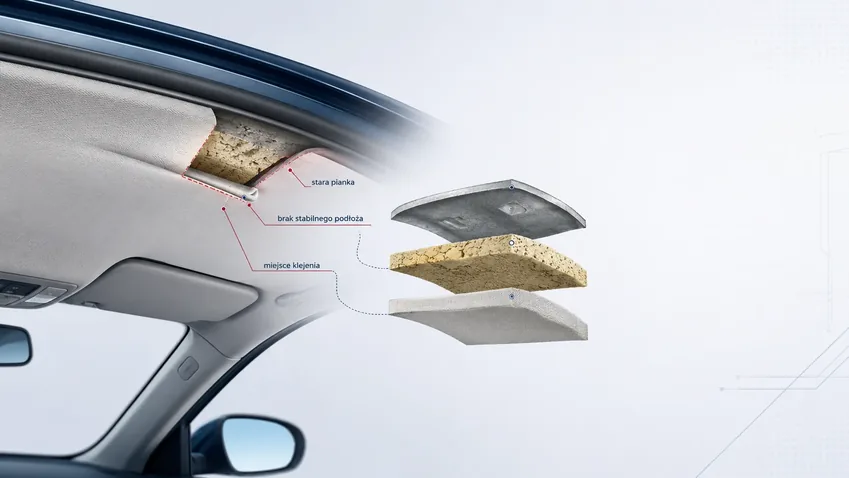
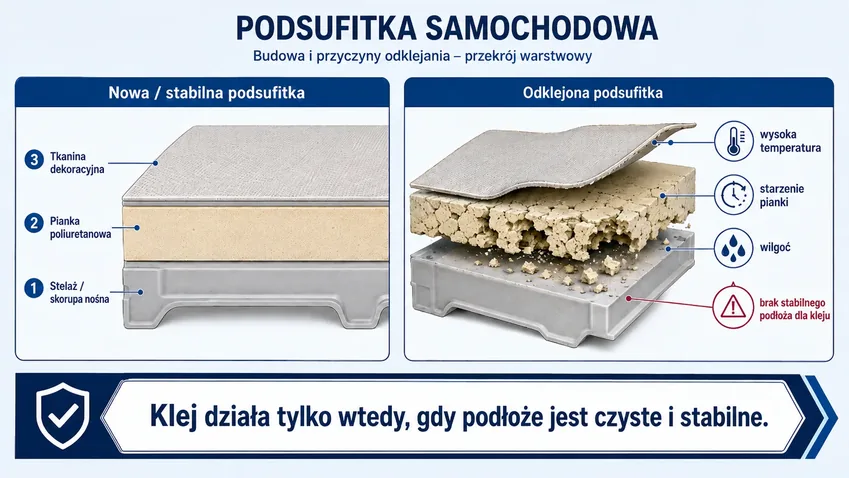
A detached headliner is most often caused by ageing adhesive or deterioration of the foam between the fabric and the backing panel. High temperatures under the vehicle roof, moisture, contamination and previous repairs carried out with an unsuitable adhesive can accelerate the problem. This is why a headliner repair should begin with assessing the condition of the substrate rather than choosing an adhesive.
In practice, the problem is rarely caused solely by the adhesive failing. Very often, the real cause is an old, brittle foam layer that is no longer a stable bonding surface. If new adhesive is applied to dust or degraded foam, it will bond to a layer that will soon come away together with the fabric.
- Adhesive ageing - after years of use, the original bond loses flexibility and adhesion.
- Foam deterioration - old polyurethane foam crumbles, produces dust and can no longer support the weight of the material.
- High temperature - the roof of a vehicle can become very hot, so ordinary universal adhesives may soften and fail.
- Moisture - leaks around the antenna, sunroof or seals can weaken the bond.
- Contamination - dust, grease, nicotine and residues of cleaning products reduce adhesion.
- Stress around fittings - the material often comes loose near interior lights, handles, pillars and sun visors.
- Previous repair with the wrong adhesive - an adhesive that is too wet, too fluid or insufficiently heat-resistant may stain the material and fail again.
What should you use to glue a car headliner?
A car headliner is best bonded with a contact adhesive intended for fabrics, foams and upholstery applications. For a local repair without removing the headliner, a spray adhesive is usually the most convenient option because it allows a thin and even layer to be applied in difficult-to-access areas. Around edges, corners and areas where greater application control is needed, a brush-applied contact adhesive can also be considered.
Not every spray adhesive is suitable for a headliner. Spray is only a method of application. Suitability depends on the intended use of the product, its temperature resistance, compatibility with the fabric and foam, bond flexibility and the way the surface is prepared.
Hot-melt adhesives can be used for selected upholstery jobs, but they should not automatically be chosen for repairing a headliner without removal. With this type of solution, particular attention should be paid to temperature resistance, application method and the risk of locally stiffening the material. For headliner repairs, contact adhesives specifically intended for fabrics and foams are usually the safer starting point.
At Melkib, you can check the car headliner adhesive category. Do not choose a product only because it is supplied as a spray. Check whether it is suitable for fabrics and foams, whether the manufacturer allows its use at elevated temperatures and whether the application method is appropriate for the scope of the repair.
| Scenario | What type of adhesive should be considered? | What should you watch out for? |
|---|---|---|
| Local repair without removing the headliner | Spray contact adhesive for fabrics and foams. | Do not apply an excessively thick layer. Protect the vehicle interior from overspray. |
| Edges, corners and difficult-to-access areas | Brush-applied contact adhesive. | Control the amount of adhesive so that the fabric is not saturated and hard spots are not created. |
| Larger flat surfaces | Spray adhesive or a contact adhesive suitable for larger areas. | Cover the surface evenly and observe the required flash-off time. |
| Complete headliner reupholstery after removal | Contact adhesive selected for the fabric, foam and application method. | Remove the old foam and dust down to a stable substrate before bonding. |
| Repair where the foam is crumbling | Remove the degraded layer first and only then select an adhesive. | Adhesive alone will not solve the problem if the substrate itself is breaking down. |
What properties should a car headliner adhesive have?
- Temperature resistance - a vehicle roof can become very hot in summer, so the adhesive must not soften like an ordinary office or hobby adhesive.
- Adhesion to fabrics and foams - the headliner is a layered system and the adhesive must work with soft materials.
- Flexible bond - the joint should tolerate vibration, body movement and temperature changes.
- Controlled application - an excessively wet or thick layer increases the risk of adhesive bleeding through the fabric.
- Appropriate flash-off time - with contact adhesives, rushing this stage is a common cause of poor initial adhesion.
- Material compatibility - with thin or light-coloured fabrics, it is worth carrying out a test on an inconspicuous area.
How to reattach a car headliner without removing it - step by step
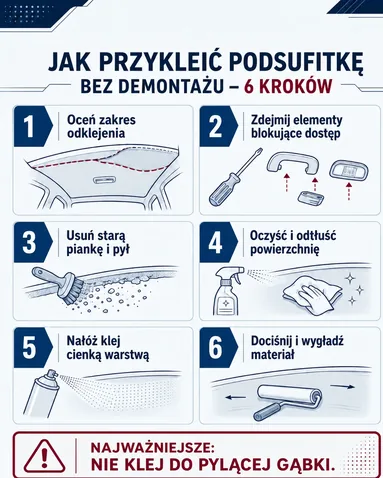
How can you reattach a headliner without removing it effectively? First assess whether the detachment is localised, then clean the substrate of loose foam and dust, degrease the surface, apply a thin layer of adhesive, wait for the required time and press the material down evenly. Repairing a headliner without removing it only makes sense when the substrate is stable.
- Assess the extent of the detachment. Check whether the problem is limited to an edge, corner, interior light, handle or sun visor. If the headliner is sagging in the centre of the roof, a local repair may only be temporary.
- Remove components that block access. These may include door seals, an interior light, grab handle, sun visor or part of a pillar trim. Do not pull the material forcefully, as this may enlarge the detached area.
- Expose only the necessary section. Lift the fabric only far enough to clean the substrate and apply adhesive. The less you disturb the stable part of the headliner, the lower the risk of further delamination.
- Remove old foam and dust. Loose, powdery material must be removed. Adhesive applied over dust will not bond the headliner to the backing panel; it will only bond to a layer that is about to detach.
- Clean and degrease the surface. The substrate should be dry, clean and stable. Do not soak the fabric or backing panel, as this may cause stains or damage the material.
- Protect the vehicle interior. When using spray adhesive, cover the windows, seats, dashboard and plastic trim. Adhesive overspray travels farther than may be apparent during application.
- Apply the adhesive according to the manufacturer's instructions. With contact adhesive, a thin, even layer and the correct flash-off time are usually important. Do not join the surfaces while the adhesive is still wet if the manufacturer requires a waiting period before assembly.
- Press the fabric from the centre towards the edges. Smooth it gradually to remove trapped air and avoid wrinkles. Once the material has made contact, do not reposition it if the adhesive has a fast contact grab.
- Allow the bond to stabilise. Do not load the freshly bonded area or reinstall components under high tension until the adhesive has reached the required stage of cure.
- Reinstall the removed components. Work carefully, especially around the edges. Excessive tension on the material may tear the fresh bond.
How to replace the entire car headliner yourself
Replacing the entire headliner is worth considering when the material is sagging over a large area, the foam is crumbling, the fabric is stained or previous repairs have left hard marks and uneven areas. This is more labour-intensive than a local repair, but it offers a better chance of achieving a durable and visually satisfactory result.
For complete headliner reupholstery, the backing panel needs to be removed from the vehicle, the old material taken off and the panel cleaned down to a stable substrate before new adhesive and fabric are applied. Take particular care when removing trim around the pillars, especially in vehicles equipped with curtain airbags.
- Remove the relevant interior components. Remove handles, sun visors, interior lights, seals and other elements securing the headliner. Watch out for wiring, sensors and safety-related components.
- Remove the headliner backing panel. Work slowly to avoid breaking the rigid panel. In some vehicles, the seats may need to be reclined or the panel removed through the tailgate.
- Remove the old fabric. After the fabric is removed, you will see the old foam and adhesive layer. This is often the part responsible for the original failure.
- Remove the old foam down to a stable substrate. Use a brush, scraper or suitable gentle mechanical tool. The substrate must be even, dry and free of dust.
- Degrease the backing panel. Remove residual contamination, grease and old adhesive, but do not soak the panel, particularly if it is made from a moisture-sensitive material.
- Apply adhesive to the backing panel and material. When reupholstering with contact adhesive, even surface coverage in accordance with the manufacturer's instructions is important.
- Observe the required flash-off time. The surface should be tacky rather than wet if this is the application method specified in the adhesive technical documentation.
- Position and smooth the material. Start in the centre and work towards the edges. Do not stretch the fabric excessively because permanent tension may encourage it to come loose again.
- Trim the excess material and cut the openings. Cut openings for handles, lights and sun visors only after the fabric has been stabilised on the backing panel.
- Reinstall the headliner in the vehicle. Before installation, make sure the adhesive has reached the required stage of cure according to the manufacturer's instructions.
Repair without removal or complete headliner replacement - which should you choose?
Choose a repair without removing the headliner when only a small local area has detached and the substrate is stable. A complete replacement is the better option when the headliner is sagging extensively, the old foam is crumbling or the fabric itself is damaged. The difference is not only the amount of work involved but, above all, the durability of the result.
| Criterion | Repair without removal | Complete headliner replacement |
|---|---|---|
| When to use it | When a small section, edge or area near a fitting has detached and the rest of the headliner remains firmly attached. | When the headliner is sagging over a large area, the foam is crumbling or the fabric is damaged. |
| Amount of work | Low to moderate. Requires access to the repair area and careful preparation of the surface. | High. Requires removal of interior components, removal of the backing panel and reupholstering of the entire surface. |
| Extent of disassembly | Local: a seal, handle, interior light, sun visor or part of a pillar trim. | Extensive: headliner fasteners, pillars, lights, handles, seals and the entire headliner panel. |
| Durability | Good only when the substrate is stable, clean and free from deteriorated foam. | Usually better because the old load-bearing layer is removed and the bonding process is carried out again from the beginning. |
| Difficulty | Lower, but careful adhesive application and pressing of the material are still required. | Higher, especially with large panels, shaped sections and delicate interior trim. |
If the problem is small and recent, repairing the headliner without removing it may be sufficient. If the headliner is sagging across a large area, however, adding adhesive locally will usually only postpone the problem.
Which repair method should you choose in a specific situation?
The best method depends on the extent of the detachment, the condition of the foam and the condition of the fabric. The table below helps you quickly decide whether a local headliner repair is sufficient or whether complete replacement should be planned.
| Situation | Recommended approach |
|---|---|
| A single section has detached and the rest remains secure | Choose a local repair without removing the entire headliner. Clean the area, remove loose foam, degrease the surface and use a contact adhesive suitable for automotive upholstery. |
| The headliner is sagging over a larger area | Consider complete replacement of the material after removing the backing panel. Local bonding may not withstand the weight and stresses acting over a large area. |
| The material is stained, faded or damaged | Complete replacement is usually the better solution. Adhesive alone will not improve the appearance of old, damaged fabric. |
| The foam is crumbling in an older vehicle | Completely clean the backing panel and reupholster the headliner. Bonding to dust or deteriorated foam will not produce a durable repair. |
| Limited time or lack of experience | A small detached area can be repaired locally. For a larger problem, it may be safer to have the work carried out by an automotive upholsterer. |
The most common mistakes when bonding a car headliner
Most unsuccessful repairs are caused not by the adhesive brand itself, but by poor preparation and rushing the process. Headliner bonding requires a stable substrate, a thin adhesive layer and the correct flash-off time whenever this is required by the manufacturer.
- Bonding to old foam - the new adhesive sticks to dust rather than to the backing panel.
- Failure to degrease the surface - grease, dust and nicotine reduce adhesion.
- Applying too much adhesive - this may cause bleed-through, staining and uneven areas.
- Joining the surfaces too quickly - with contact adhesives, the solvent usually needs time to evaporate.
- Using an ordinary universal adhesive - a product without sufficient temperature resistance may fail in hot weather.
- Choosing an adhesive only because it comes in a spray can - spray application is convenient, but not every spray adhesive is suitable for headliners.
- Excessively stretching the fabric - too much tension encourages the material to detach again around edges and recesses.
- Failing to protect the vehicle interior - adhesive overspray can contaminate windows, plastic trim and upholstery.
- Failing to test the product on an inconspicuous area - thin fabrics may stain or allow the adhesive to bleed through.
FAQ - frequently asked questions
How long does car headliner adhesive take to dry?
Drying time depends on the specific adhesive, temperature, ventilation, layer thickness and absorbency of the materials. Always check the manufacturer's instructions separately for flash-off time, pressing time and full cure. Do not assume that every spray adhesive works in the same way.
Can a car headliner be repaired effectively without removing the backing panel?
Yes, but only when the detachment is localised and the substrate is stable. If the old foam is deteriorating over a larger area, a repair without removing the backing panel will usually be temporary. In that case, cleaning the entire panel and reupholstering it provides a more durable solution.
Is an ordinary spray adhesive suitable for a car headliner?
Not every spray adhesive is suitable for a car headliner. The product should be intended for fabrics, foams and upholstery applications and should have appropriate temperature resistance. Ordinary decorative or hobby spray adhesives may soften under a hot vehicle roof.
How much does it cost to repair a car headliner yourself?
The cost of a DIY headliner repair depends on the extent of the damage, the type and quantity of adhesive and whether only a local repair or a complete replacement is required. For a small detached area, a suitable adhesive, cleaning material and basic tools may be sufficient. A complete reupholstery job also requires new fabric, a larger quantity of adhesive and considerably more working time.
Can a car headliner be bonded in winter or in an unheated garage?
Only if the temperature and humidity are within the limits specified by the adhesive manufacturer. Low temperatures slow evaporation and may reduce initial grab. A damp substrate further increases the risk of a weak bond.
What should you do if the headliner comes loose again after repair?
First determine whether the adhesive itself has released or whether the old foam has torn away. If a powdery foam layer is visible on the fabric or backing panel, the problem was not simply the adhesive but an unstable substrate. The old layer then needs to be removed and the repair repeated.
Can headliner adhesive bleed through the fabric?
Yes, especially if too much adhesive is applied, if the product is too fluid or if the correct spraying distance is not maintained. Adhesive bleed-through can leave permanent stains and hard spots on the visible side of the fabric. It is therefore better to apply thin, even layers and test the adhesive on an inconspicuous section of the material first.
Summary - how to make the right decision
If you want to know how to reattach a car headliner without removing it, start by assessing the substrate. A small detached section, a clean surface and stable foam provide a good scenario for a local repair. Extensive sagging, powder from degraded foam and damaged fabric indicate that complete replacement is the better option.
For the repair, choose a contact adhesive intended for automotive upholstery and suitable for the conditions that occur under a vehicle roof. If you need to select a product for a local repair or complete headliner reupholstery, check the car headliner adhesive category at Melkib. With unusual materials or larger surfaces, compare the application method, temperature resistance and manufacturer's recommendations before purchasing.
The best next step is not to buy the “strongest adhesive”, but to select a product that matches the condition of the headliner. With a stable substrate, a suitable contact adhesive can solve a local problem. With deteriorated foam, the underlying cause must be removed first; otherwise, the repair will only postpone the problem.
 Log in with Facebook
 Log in with Google